We may use MinGW GCC toolchain in Eclipse IDE for our C/C++ projects.
As an example, we present a C mymath project that generates the shared library mymath.dll.
The later is called by a C executable example project. These two projects
are provided by Elias Volanakis
We also present the procedure for obtaining our 64-bit shared library svdComplexDevice1.dll with
MinGW GCC toolchain in Eclipse IDE.
*** Outline ***
- MinGW installation
- PATH variable editing for MinGW
- The C shared library mymath project with MinGW GCC toolchain in Eclipse IDE
- The C executable example project calling mymath.dll
with MinGW GCC toolchain in Eclipse IDE
- User environment variables in Windows 10
- The C++ 64-bit shared library svdComplexDevice1.dll project with MinGW GCC toolchain in Eclipse IDE
- Various references
MinGW installation
Semicolon: How to fix MinGW file downloaded incorrectly error
- Download MinGW-W64 online installer (MinGW-W64-install.exe) for 32 and 64 bit Windows.
- Create an empty folder mingwu on C disk, for example C:\mingw
- Click MinGW-W64-install.exe.
Welcome panel appears.Click Next > button.
- Settings panel appears.
Select x86_64 for Architecture.Click Next > button.
- Installation folder panel appears.
Select C:\mingw.Click Next > button.
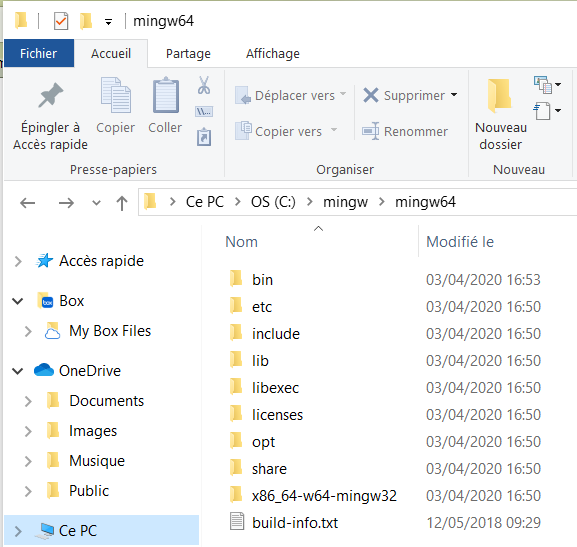
- After installation, the folder contains:
PATH variable editing for MinGW
After installing MinGW, edit PATH variable of Windows 10.
- Right click PC computer then select Properties.
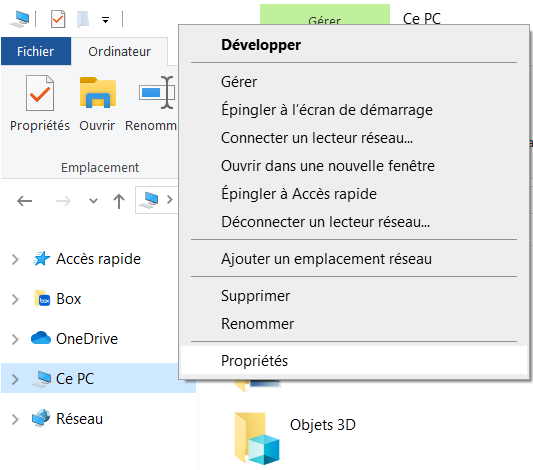
- System panel appears.
Select Advanced system parameters.
System properties panel appears.Click Environment Variables... button.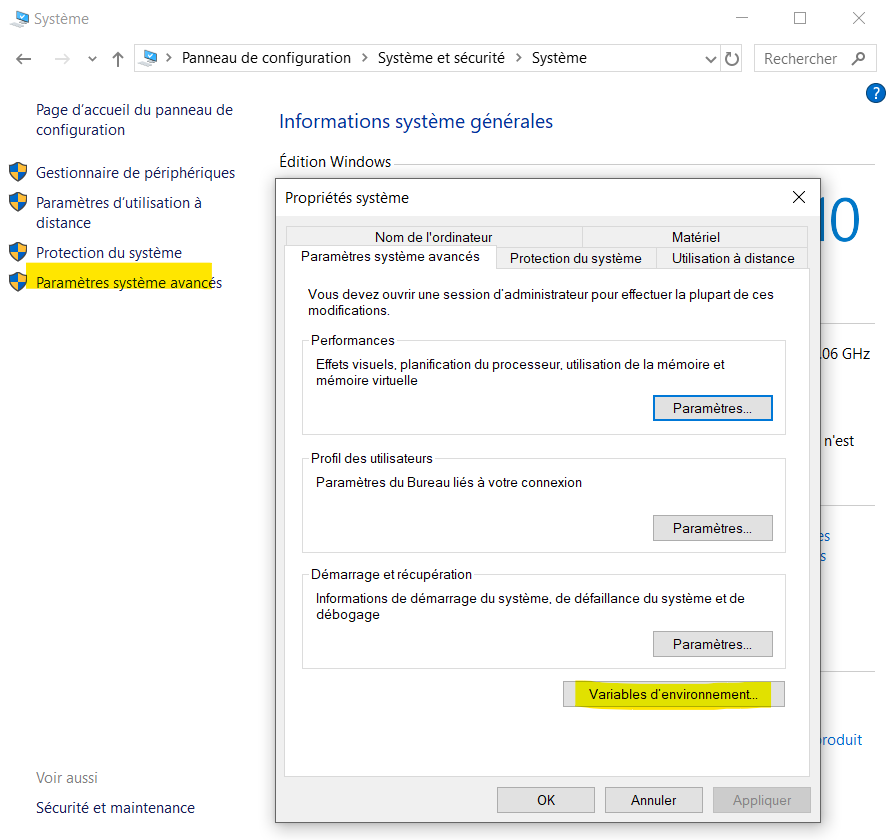
- Environment variables panel appears.
Select Path in System variable box.
- Click Edit... button.
Click Modify... button.
Click New button.
Add C:\mingw\mingw64\binClick OK button.
- Test your installation:
Enter cmd in Search of Windows.
The command prompt of Windows appears.
Enter g++ --version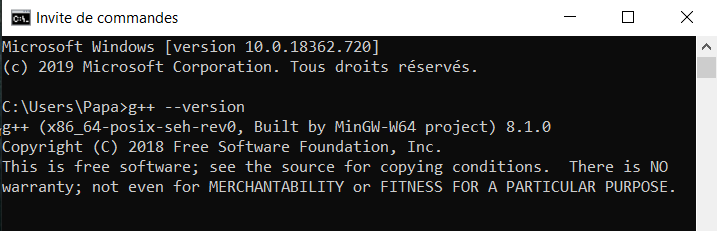
C shared library mymath project with MinGW GCC toolchain in Eclipse IDE
- Launch Eclipse IDE for C/C++ Developers.
Select Create a new C or C++ project.
- New C/C++ Project panel appears.
Select C Managed Build.Click Next > button.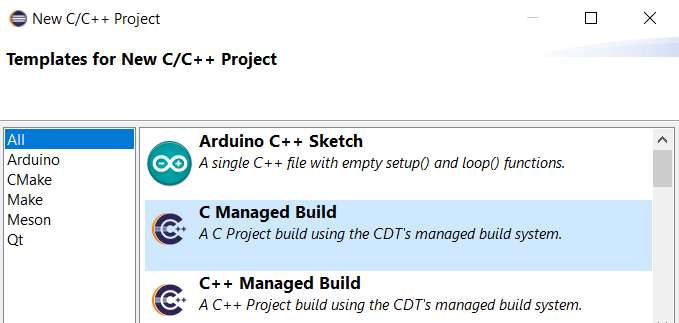
- C Project panel appears.
Provide Project name: mymath
Select Shared Library then Empty Project.
Select MinGW GCC in Toolchains.Only two toolchains are available.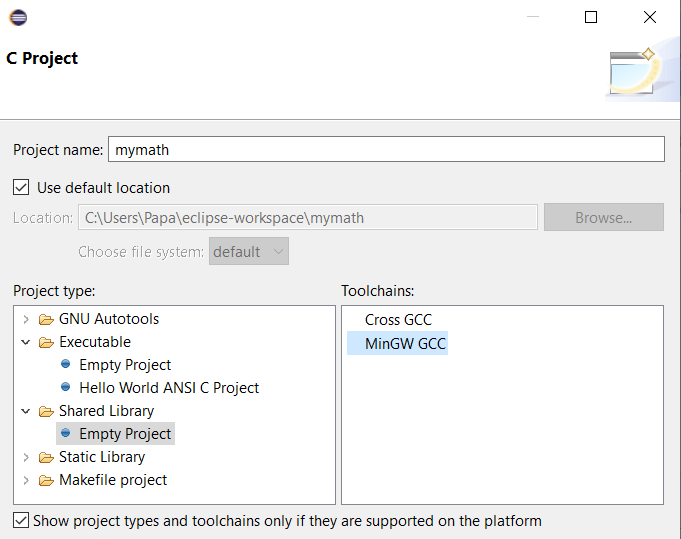
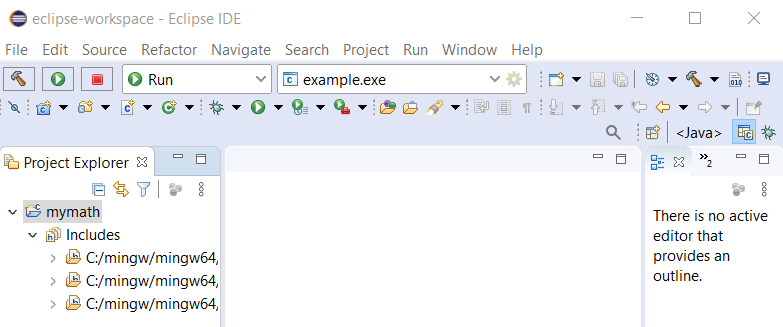
Click Finish button. - The project folder mymath appears in Project Explorer of Eclipse.
- Click File menu. Select New, then Header File.
Provide the name for Hearder file: mymath.hClick Finish button.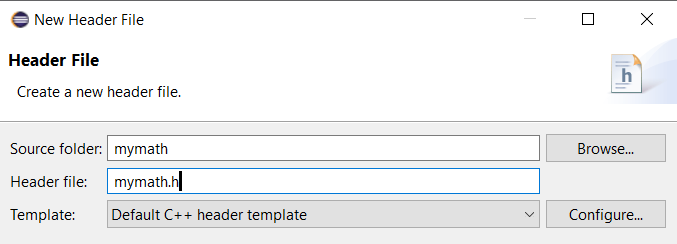
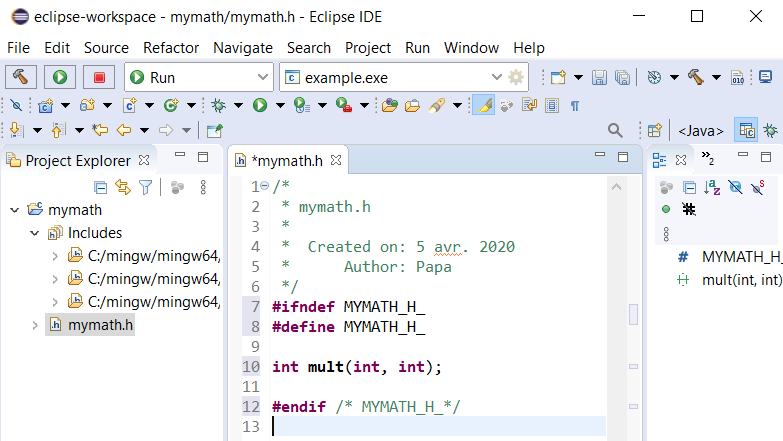
- Copy and past mymath.h file into the newly created header file.
- Click File menu. Select New, then Source File.
Provide the name for Source file: mymath.cClick Finish button.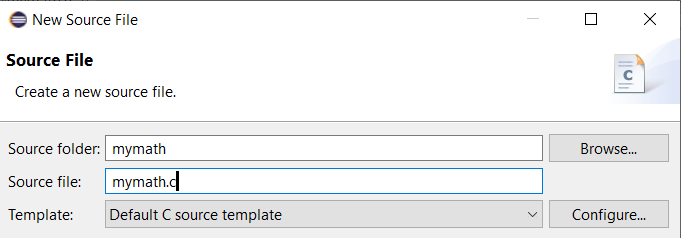
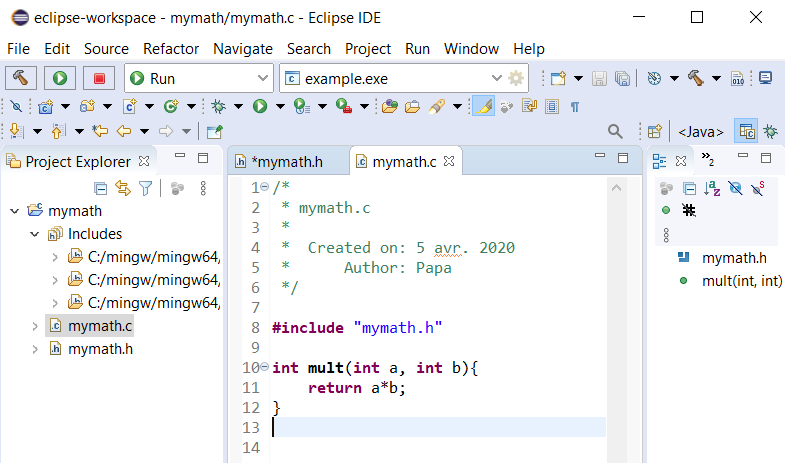
- Copy and past mymath.c file into the newly created source file.
- Select Project menu then Build All.
Two folders, Binaries and Debug, appear in Project Explorer. They contains the 64-bit DLL file libmymath.dll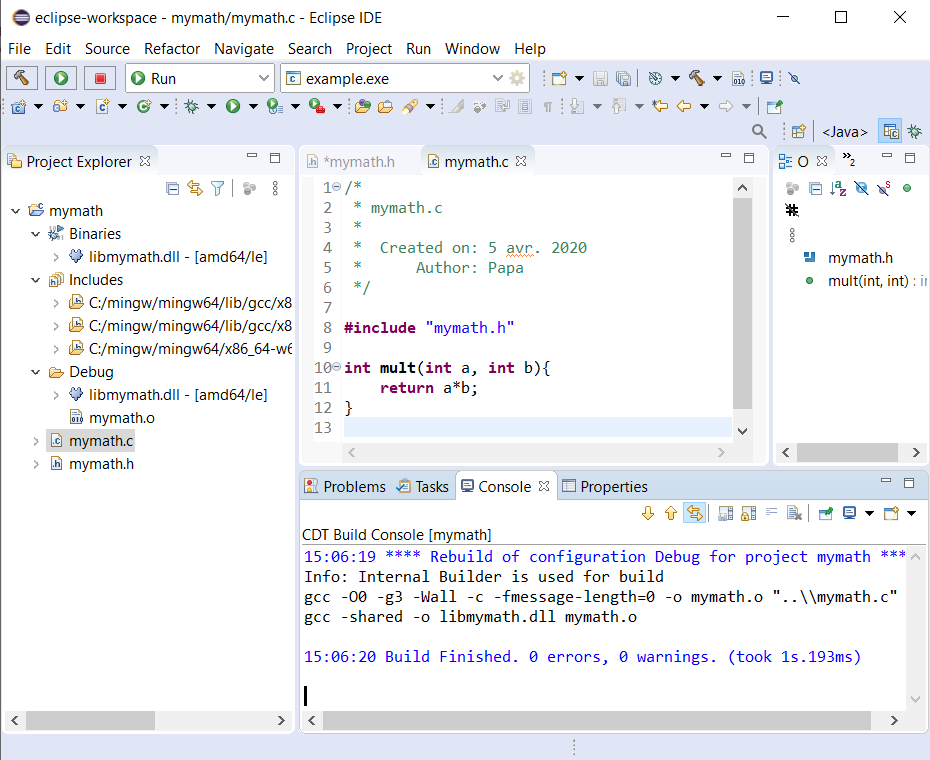
- To delete the first three letters lib in libmymath.dll,
right click the project name in Project Explorer.
Select Properties...
Properties for mymath panel appears.
Click C/C++ Build then Settings.
Click Build Artifact tab.
Delete lib in Output prefix.Click Apply and Close button.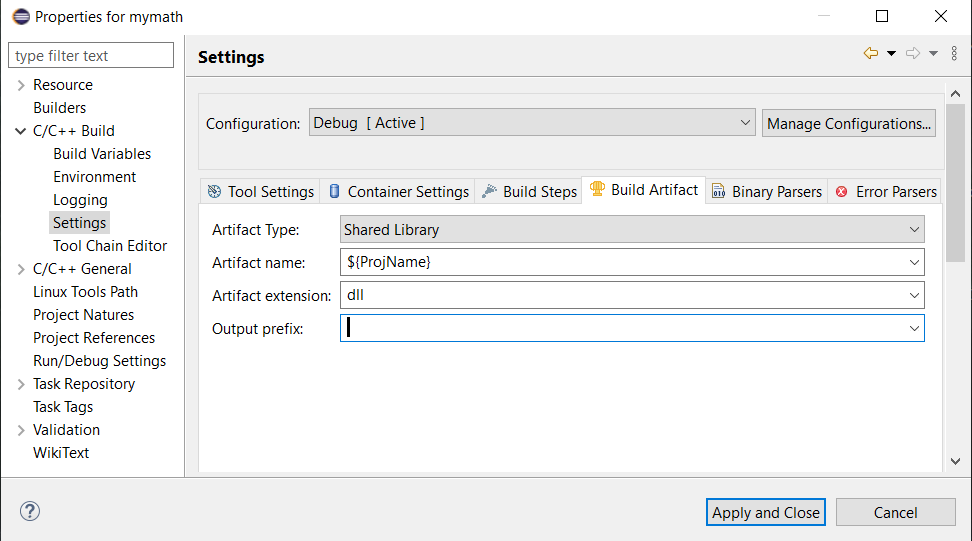
- Select Project menu then Build All.
A new 64-bit DLL file, mymath.dll, is generated in Binaries and Debug folders.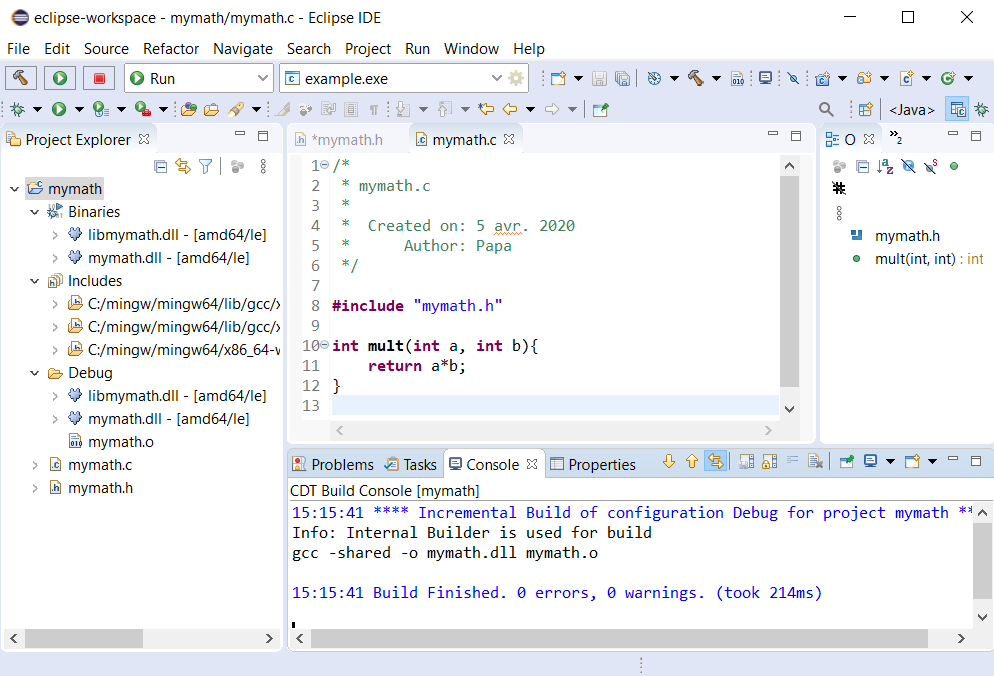
- To delete libmymath.dll, right click it in Project Explorer then select Delete.
C executable example project calling mymath.dll with MinGW GCC toolchain in Eclipse IDE
We must specify three data during the setup of this project:
(1) the path of header file mymath.h to the compiler,
(2) the shared library mymath.dll and the path of its folder to the linker,
(3) the folder path of shared library mymath.dll to operating system Windows 10.
- Click File Menu of Eclipse. Select New, then C/C++ Project.
New C/C++ Project panel appears.
Select C Managed Build.
Click Next > button.
C Project panel appears.
Select Empty Project for Executable.
Select MinGW GCC for Toolchains.
Provide the project name: exampleOnly two toolchains are available.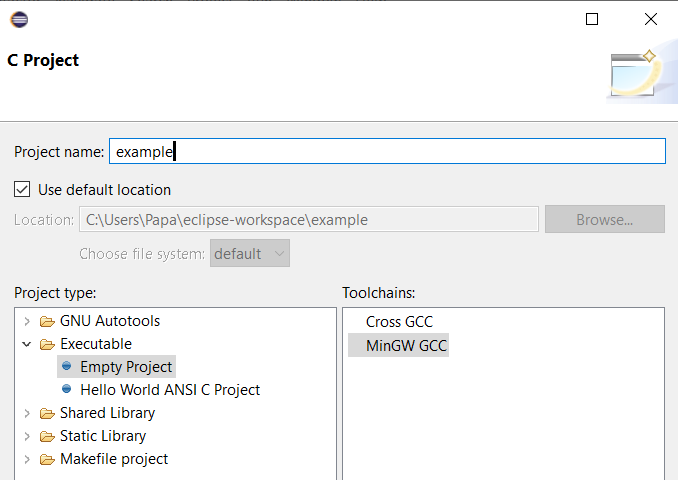
Click Finish button. - Right click example project in Explorer Project, then New, finally Source File.
New Source file panel appears. Provide the name for Source file: example.c
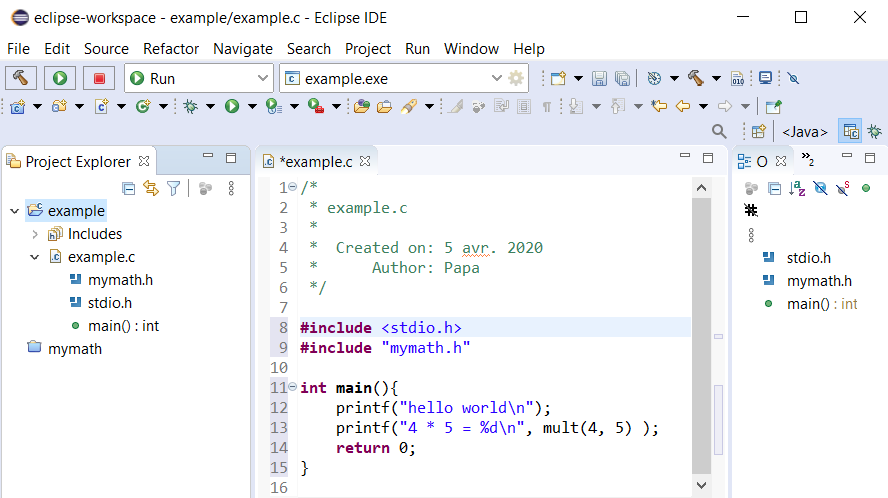
Click Finish button. - Copy example.c and paste it into the newly generated file.
#include "mymath.h" is wavy underlined in red.
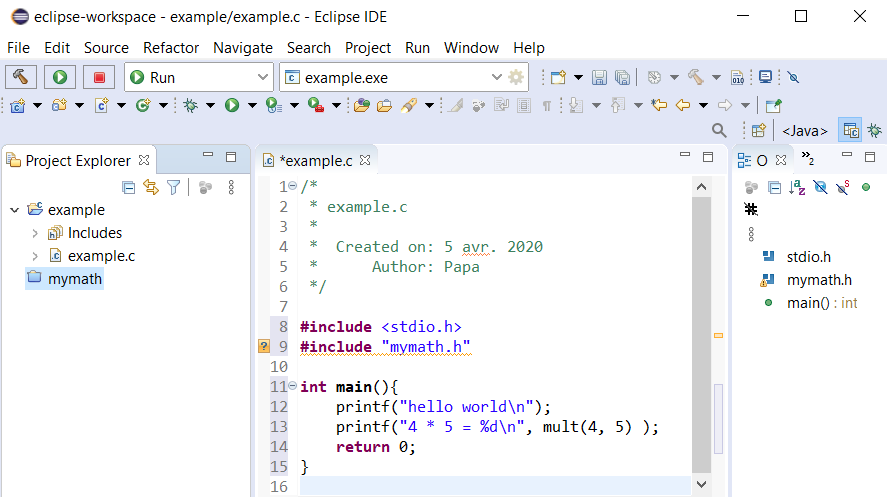
You must provide the pathway of mymath.h to compiler. It is in the folder of C shared library mymath project. - Right click the project name example in Explorer Project then select Properties.
Properties for example panel appears.
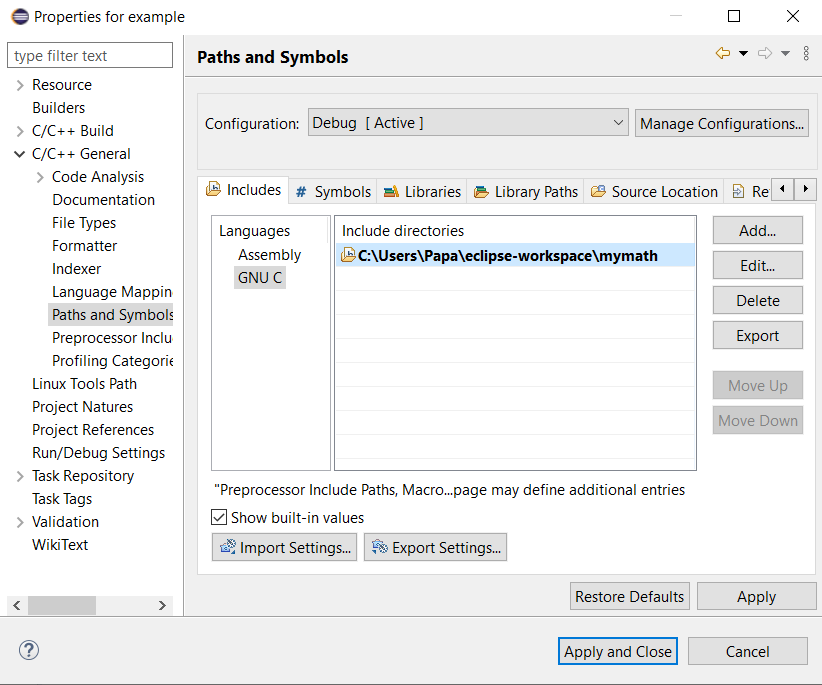
Click C/C++ General then Paths and Symbols.
Click GNU C in Includes tab.
Click Add... button.
Add directory path panel appears.
Provide the pathway:
C:\Users\Papa\eclipse-workspace\mymathClick OK button.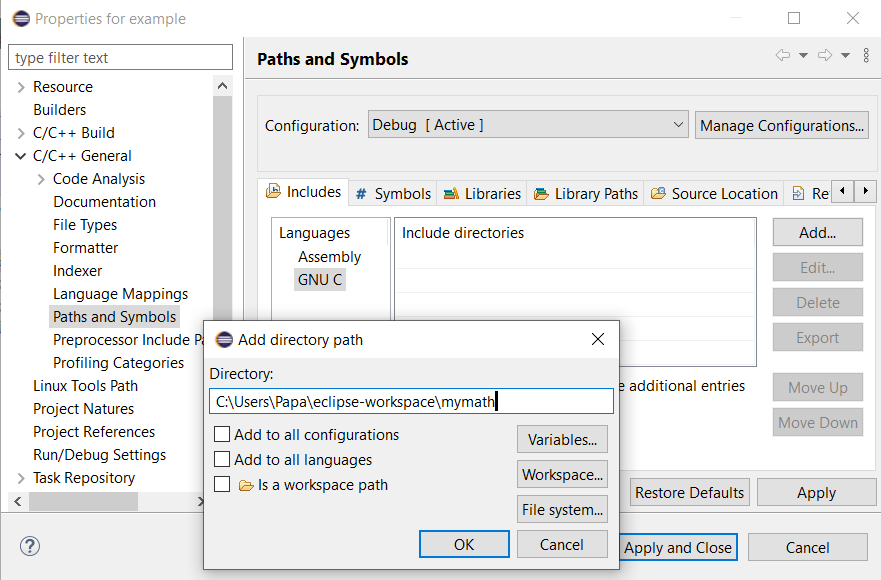
- Click Apply button.
- You must provide the filename mymath.dll required for this project and its folder location
to linker. As a result, the later knows where the shared library is.
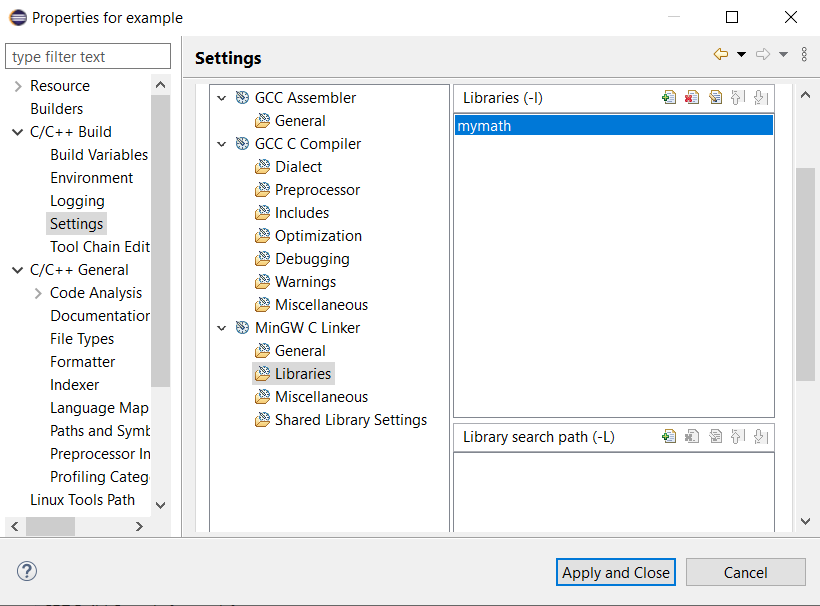
Click C/C++ Build then Settings.
Click Libraries for MinGW C Linker in Tool Settings tab.Click + symbol in top part of Libraries (-l).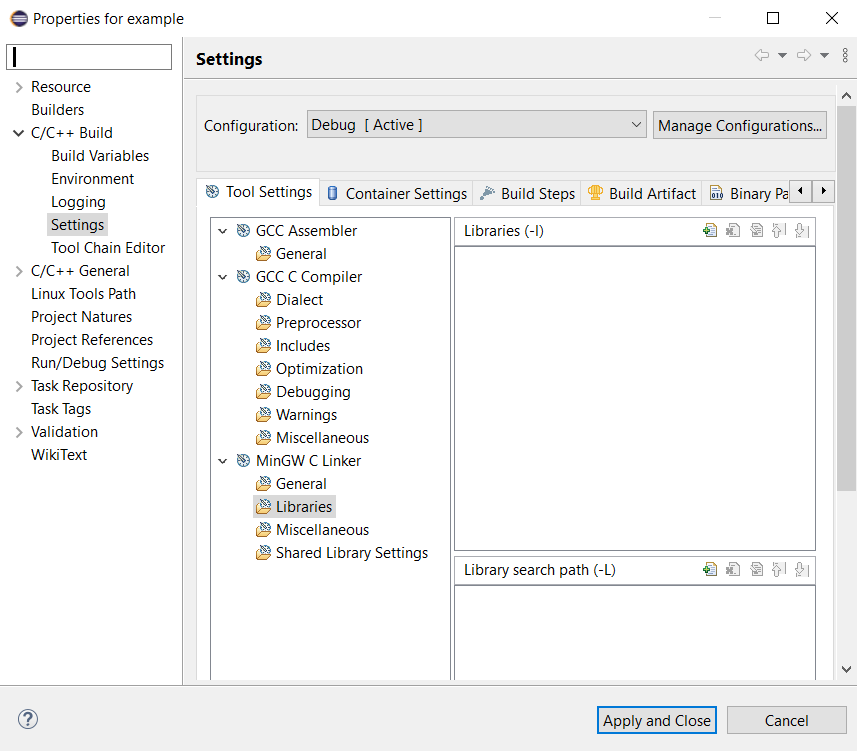
- Enter Value panel appears.
Provide mymath, the required DLL file without file extension.Click OK button.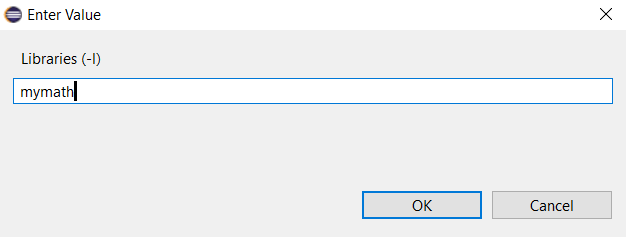
- Click + symbol in top part of Library search path (-L).
- Add directory path panel appears.
Provide the pathway of the project folder containing the required DLL file:
C:\Users\Papa\eclipse-workspace\mymath\DebugClick OK button.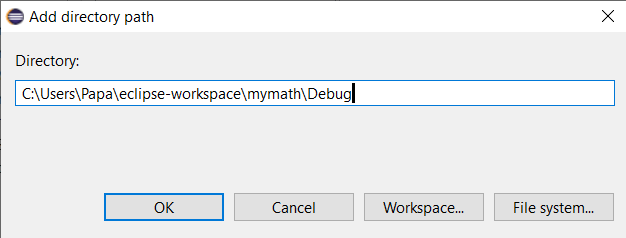
- Click Apply button.

- Change user environment variable so that the operating system Windows 10 knows
where the shared library mymath.dll is during the run time of example.exe.
Click Environment of C/C++ Build.
Select PATH.
Click Edit... button.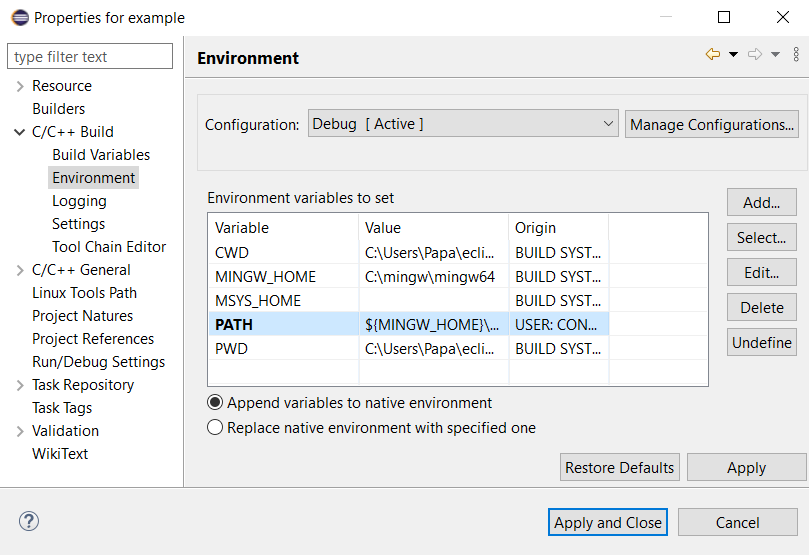
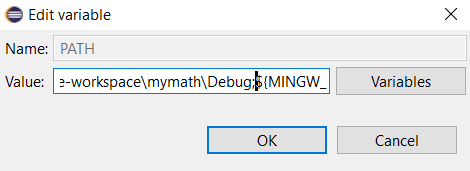
- Edit variable panel appears.
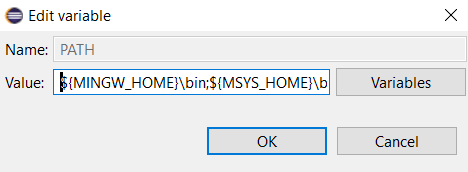
- Insert the path: C:\Users\Papa\eclipse-workspace\mymath\Debug;
Click OK button.
- Click Apply and Close button.

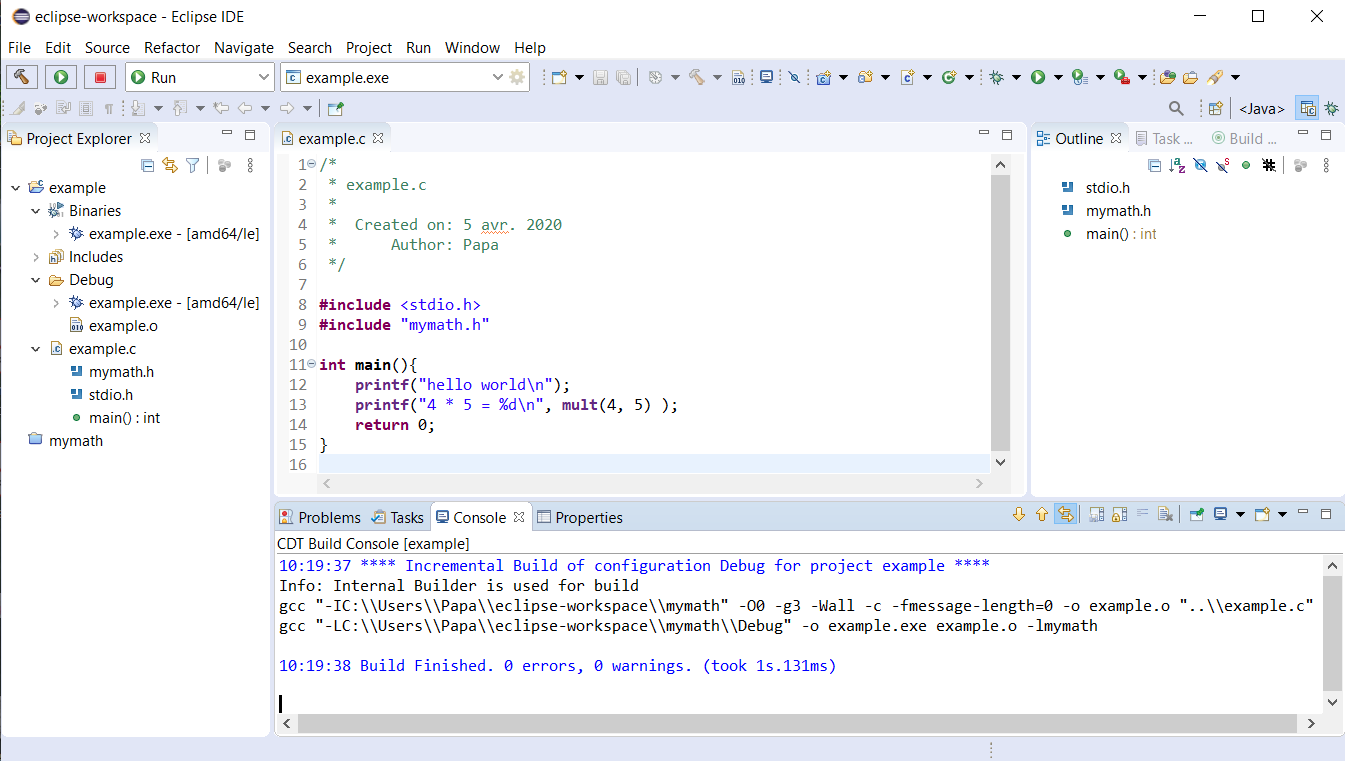
- The project before Build.
Press Ctrl S to save example.c.
- Select Project menu then Build Projet.
64-bit example.exe file is generated in Binaries and Debug folders.
- Select Run menu then Run.
Select Local C/C++ Application then click OK button.

- Select Run menu then Run.
The result appears on Console panel.

- Select Run menu then Run Configurations...
Click C/C++ Application.Click Close button.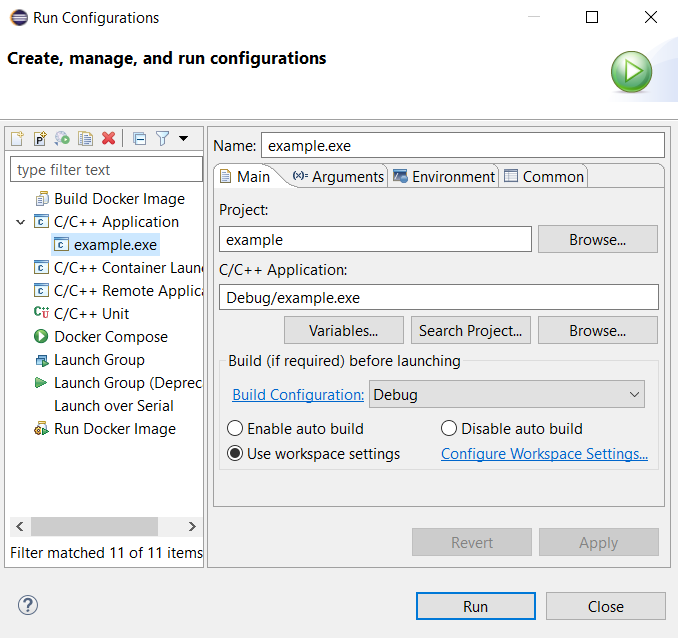
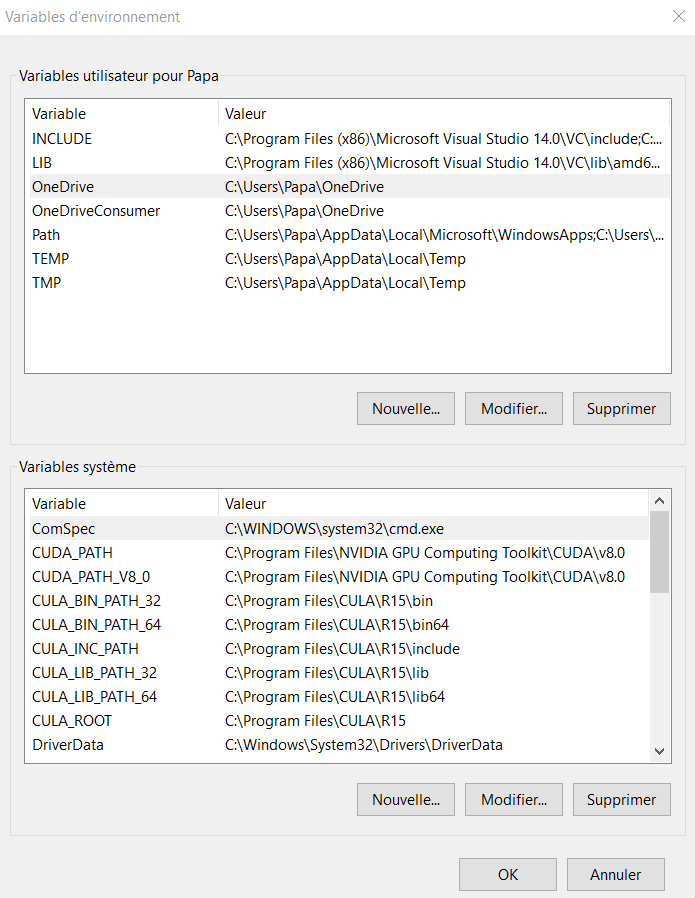
User environment variables in Windows 10
To reduce the numbers of messages during the setup of any 64-bit project, we have already included the six paths into user environment variables (INCLUDE, Path, and LIB) of Windows 10:
-
C:\Program Files (x86)\Microsoft Visual Studio 14.0\VC\include
for cancelling wavy underlines (iostream)
C:\Program Files (x86)\Windows Kits\10\Include\10.0.17763.0\ucrt
for corecrt.h -
C:\Program Files (x86)\Microsoft Visual Studio 14.0\VC\bin\amd64
for compiler cl.exe -
C:\Program Files (x86)\Microsoft Visual Studio 14.0\VC\lib\amd64
for msvcprt.lib
C:\Program Files (x86)\Windows Kits\10\Lib\10.0.17763.0\um\x64
for kernel32.lib
C:\Program Files (x86)\Windows Kits\10\Lib\10.0.17763.0\ucrt\x64
for ucrt.lib
Windows 10 user and system environment variables:
C++ 64-bit shared library svdComplexDEvice1.dll project with MinGW toolchain in Eclipse IDE
- Launch Eclipse IDE for C/C++ Developers.
Select Create a new C or C++ project.
- New C/C++ Project panel appears.
Select C++ Managed Build.Click Next > button.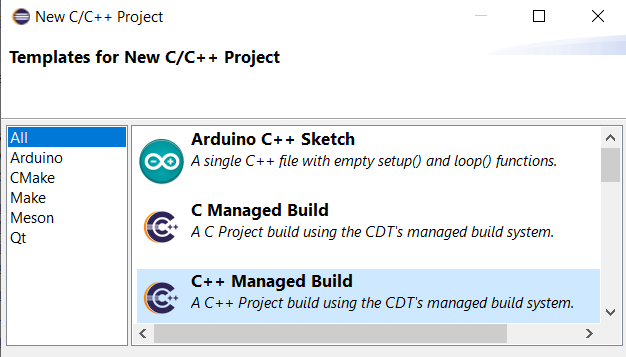
- C++ Project panel appears.
Provide Project name: svdComplexDevice1
Select Shared Library then Empty Project.
Select MinGW GCC in Toolchains.Only two toolchains are available.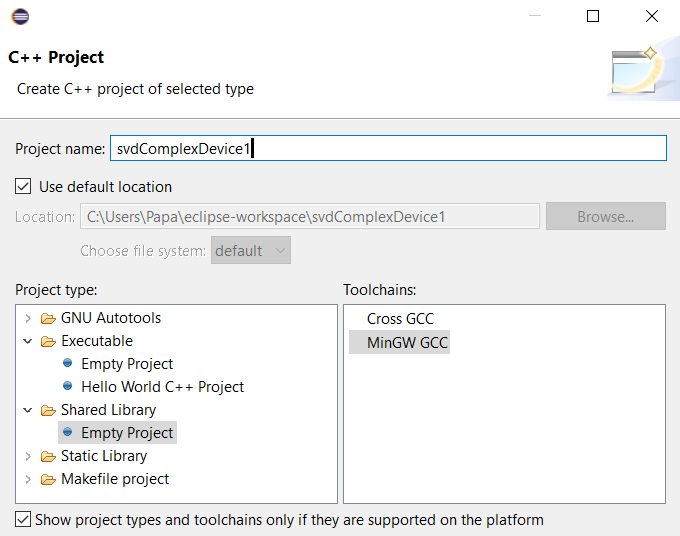
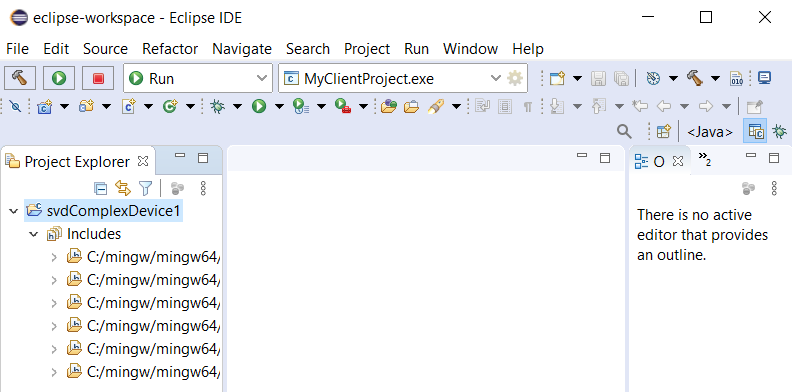
Click Finish button. - The project folder svdComplexDevice1 appears in Project Explorer of Eclipse. it
contains Includes folder.
- Click File menu. Select New, then Header File.
Provide the name for Header file: svdComplexDevice1.hClick Finish button.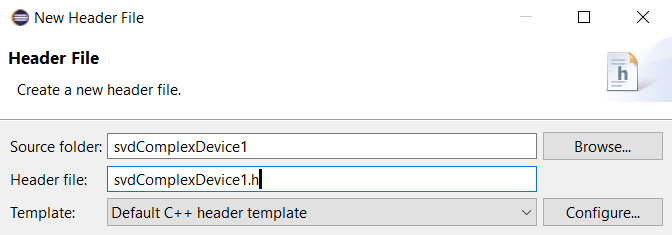
- Copy and past svdComplexDevice1.h
file into the newly created header file.
Press Ctrl S to save svdComplexDevice1.h.

- Click File menu. Select New, then Source File.
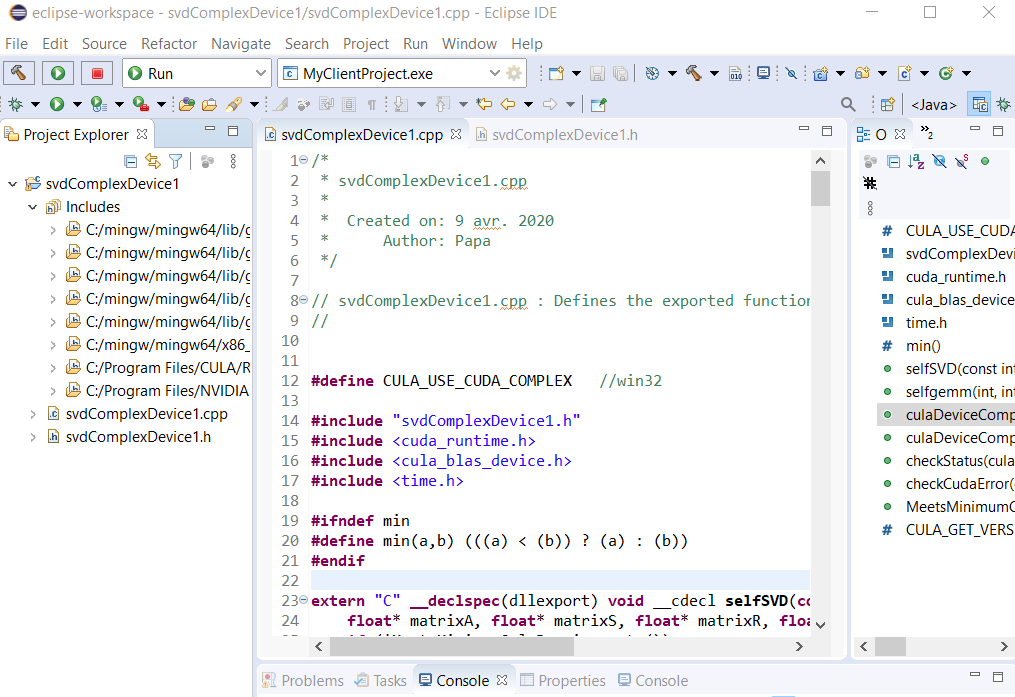
Provide the name for Source file: svdComplexDevice1.cppClick Finish button.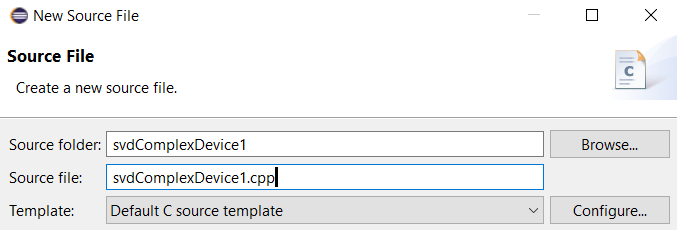
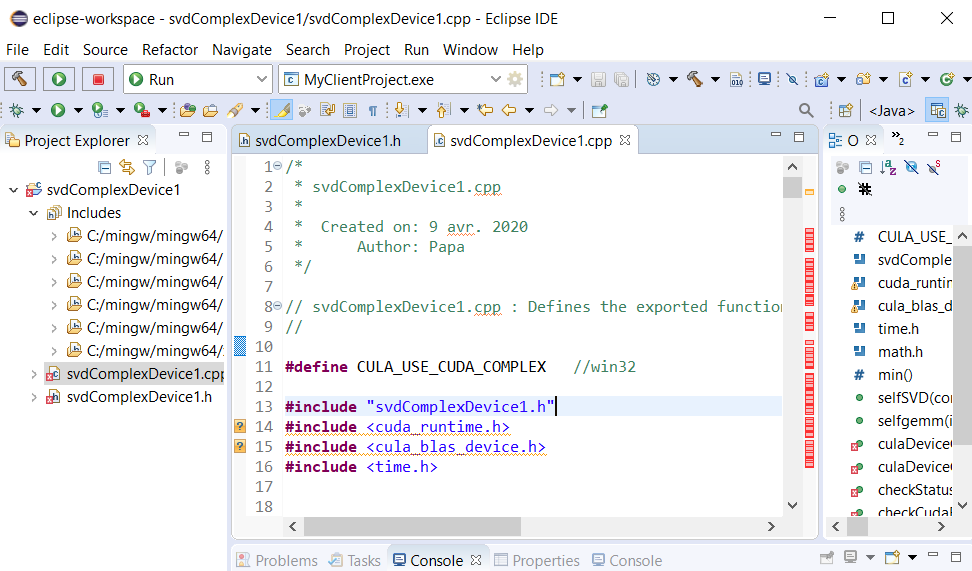
- Copy and past svdComplexDevice1.cpp
file into the newly created source file.
Press Ctrl S to save svdComplexDevice1.cpp.
- With build variables you avoid using absolute paths.
Right click svdComplexDevice1 project in Explorer Project then select Properties.
Properties for svdComplexDevice1 panel appears.
Click C/C++ Build then Build Variables.Click Add... button.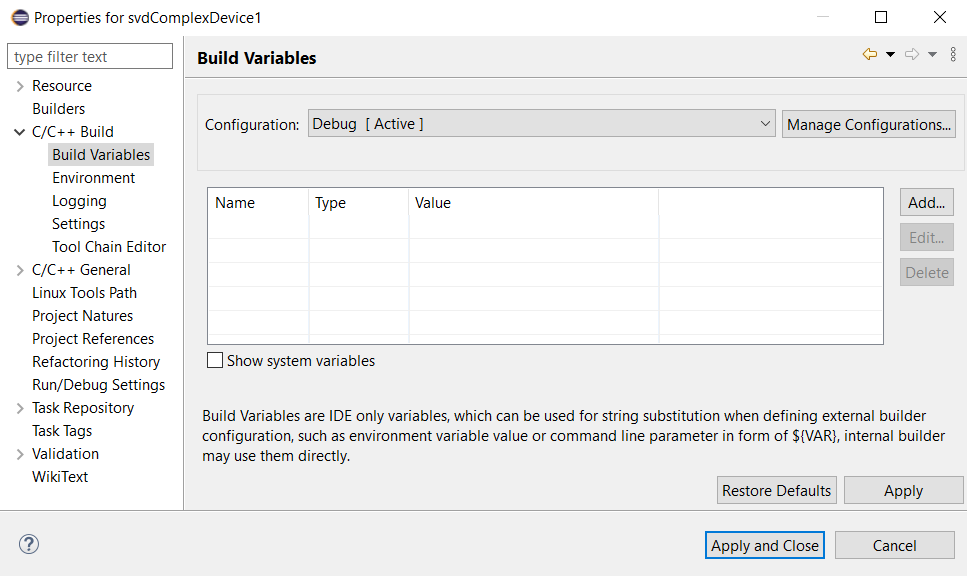
- Define a New Build Variable panel appears.
Provide Variable name: CUDA_INC_PATH
Select Path for Type.
Provide Value: C:\Program Files\NVIDIA GPU Computing Toolkit\CUDA\v8.0\includeClick OK button.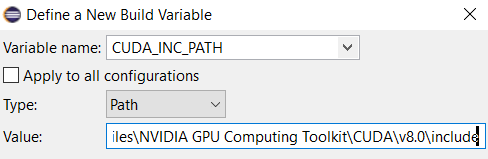
- Properties for svdComplexDevice1 appears.
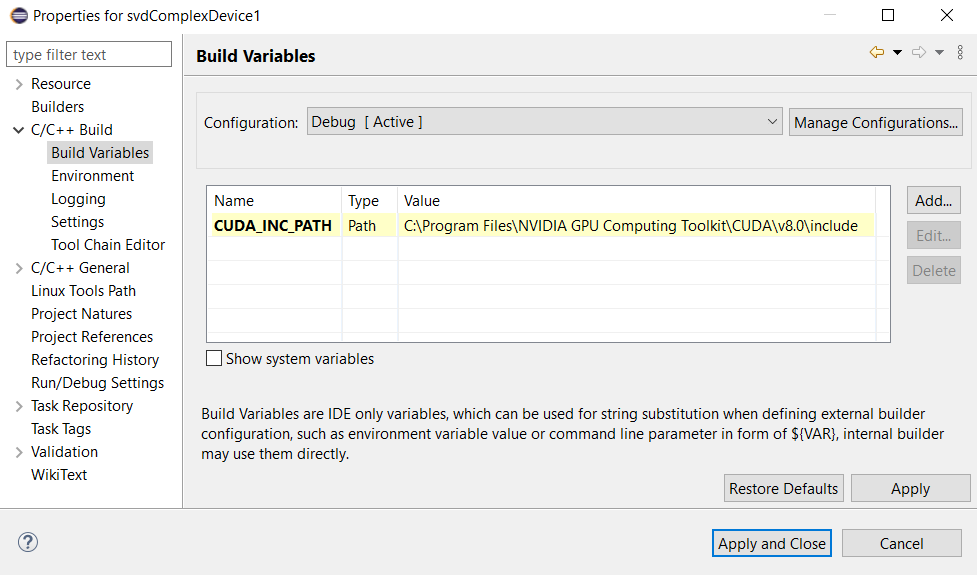
- Similarly, provide three more build variables:
CUDA_LIB_PATH_64 and C:\Program Files\NVIDIA GPU Computing Toolkit\CUDA\v8.0\lib\x64
CULA_INC_PATH and C:\Program Files\CULA\R15\include
CULA_LIB_PATH_64 and C:\Program Files\CULA\R15\lib64
CULA_INC_PATH and CULA_LIB_PATH_64 are already defined in Windows 10 system variables. As a result, their path are filled automatically.Click Apply button.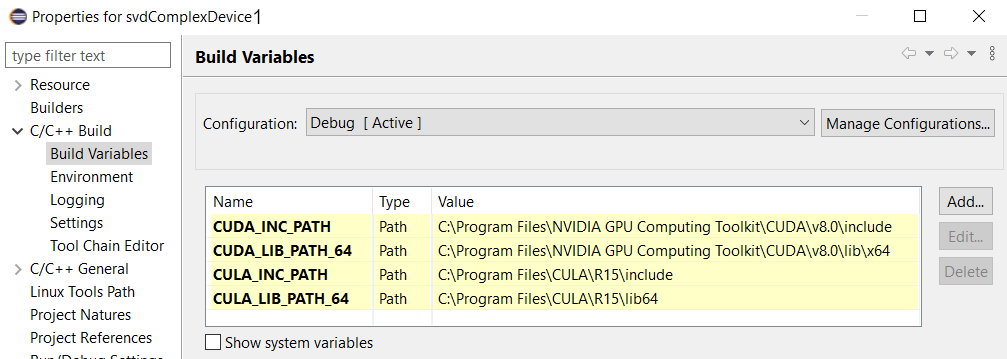
- Provide the path of include folder of CUDA and that of CULA to compiler.
Include folder contains header files.
Click Settings in C/C++ Build.
Click Includes for GCC C++ Compiler in Tool Settings tab.Click + symbol in top part of Include paths (-I).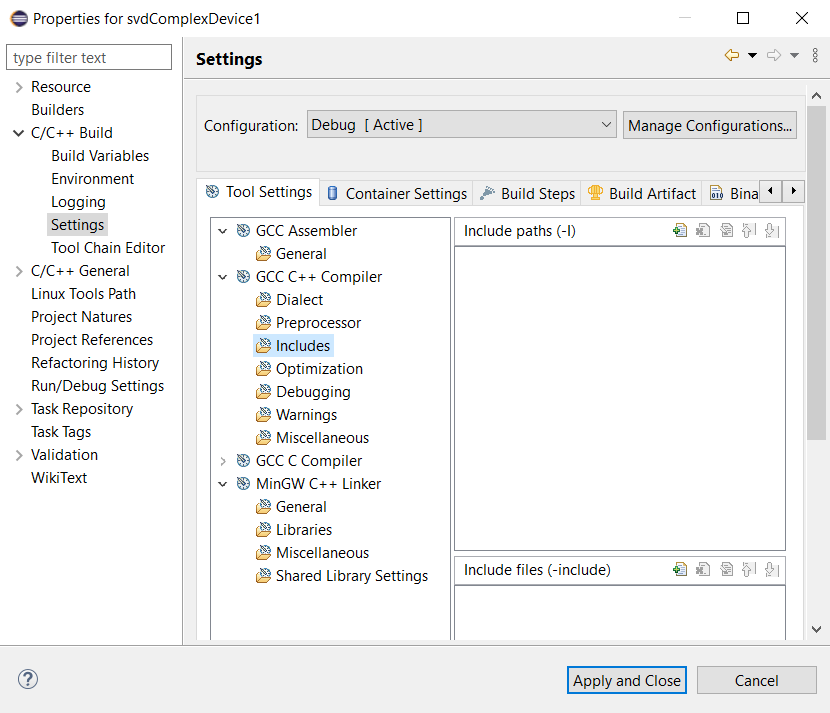
- Add directoriy path panel appears.
Provide "${CUDA_INC_PATH}" for Directory.
Directory must be enclosed in double quotes because this path contains space characters.Click OK button.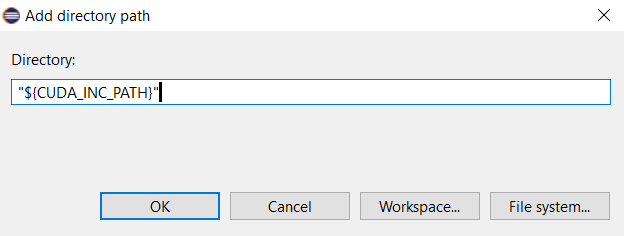
- Similarly, provide the second path.
"${CULA_INC_PATH}"Click Apply button.
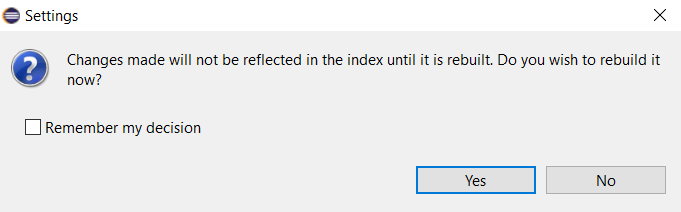
- A message apears.
Click Yes button.
- Provide four libraries (cula_core.lib, cublas.lib,
cudart.lib, and cula_lapack.lib)
and their folder location ("${CUDA_LIB_PATH_64}" and "${CULA_LIB_PATH_64}")
to the linker.
Click Libraries for MinGW C++ Linker in Tool Settings tab.
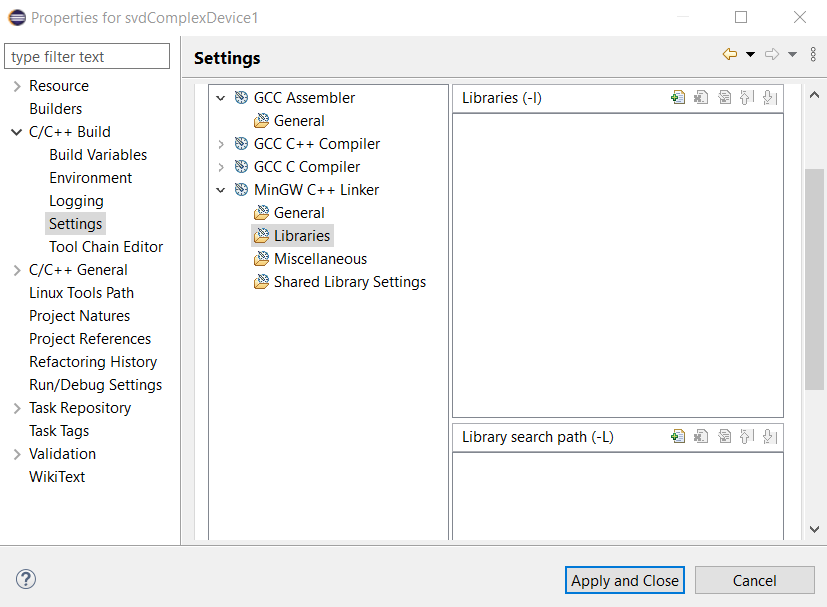
- The result is:
Library file names are provided without extension .lib and paths are enclosed in double quotes.
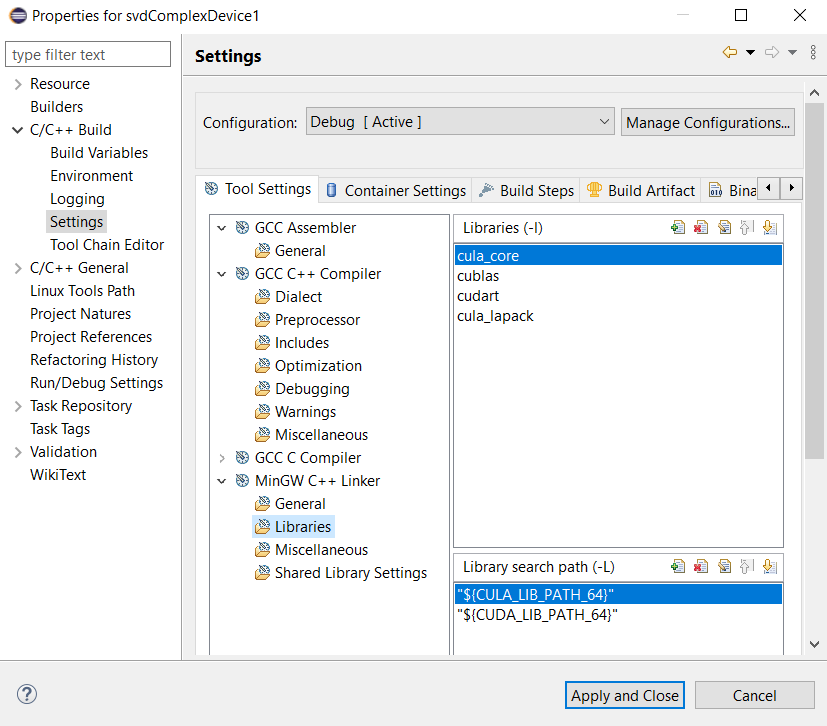
Click Apply button.
- Click Build Artifact tab.
Delete lib in Output prefix.
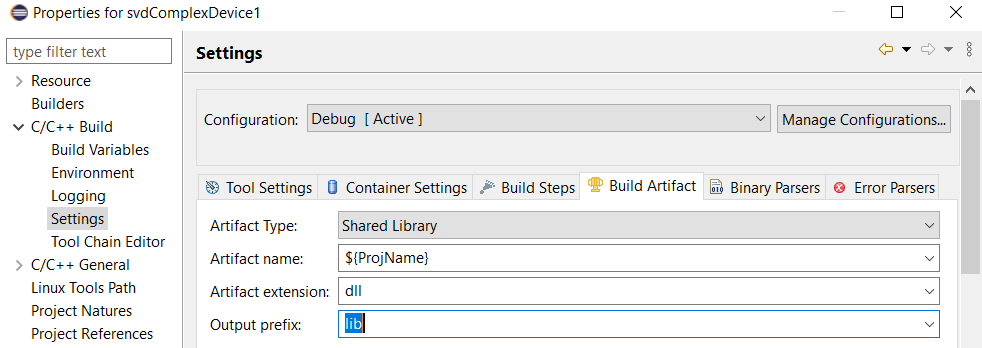
Click Apply and Close button.
- The project before Build.
- Select Project menu then Build Projet.
64-bit svdComplexDevice1.dll file is generated in Binaries and Debug folders.
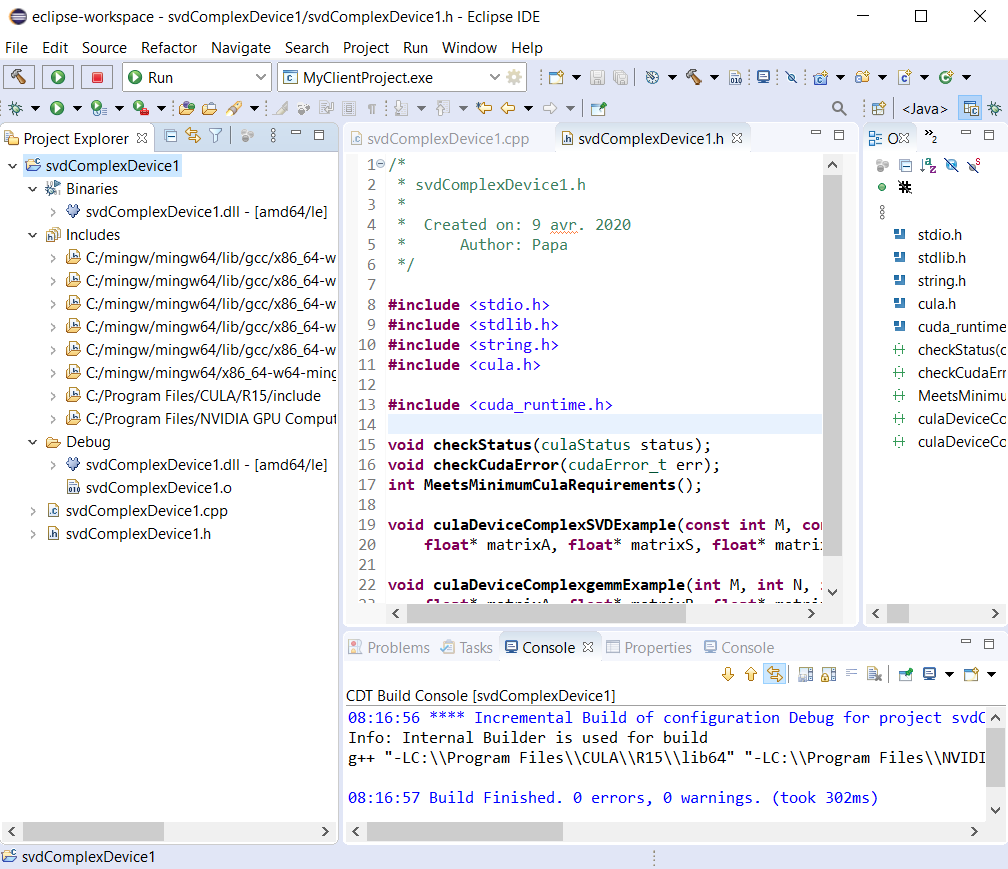
A message appears on CDT Build Console.
- Identical result can be obtained as shown below

Various references
- Eclipse Foundation:
It is essential that the installation path does not contain any spaces. Therefore, you cannot install MinGW-w64 in Program Files. We recommend to create a folder mingw-w64 on your system drive (e.g., C:\mingw). - Transmissin Zero: Build Windows DLLs with MinGW
- Cygwin: Building and using DLLs
- cplusplus: How to create and use DLL's
- Stratman, Forex Factory: C++ dll tutorials using Eclipse
- Capsis: A complete Java - C++ connection example with mingw/g++ and JNA under Windows 64 bits
- Elias Volanakis, Eclipse Source:
Shared libraries with Eclipse CDT and cygwin on Windows
The compiler and linker will not find the header files / library unless you set the appropriate parameters. The compiler needs an include path (-I). The linker needs the library name (-l) and library search path (-L). These settings are scattered in two places in the project properties. Their location is not obvious for a first-time user. - Erich Styger, MCU on Eclipse: Eclipse build variables
- Erich Styger, MCU on Eclipse: Debug vs. release?
- OpenCV: Using OpenCV with Eclipse (plugin CDT)