Your computer has a CUDA enabled Nvidia graphic processing unit (GPU).
Ensure you have Microsoft Visual Studio installed before you install the CUDA toolkit.
Not doing so will result in Visual Studio integration not functioning.
Visual Studio Community edition was announced on 12 November 2014,
as a new free version, with similar functionality to Visual Studio Professional
(Visual Studio 2015 = Visual Studio 14).
Three projects (deviceQuery.cpp, bandwidthTest.cu, and Mandelbrot.cu)
are presented for checking the installation of
CUDA in MS Visual Studio 2015.
*** Outline ***
- Installation of MS Visual Studio 2015 and Nvidia CUDA toolkit
- Installation checking with deviceQuery
- deviceQuery.cpp project
- bandwidthTest.cu project
- Mandelbrot.cu project
- CUDA and Visual Studio references
Installation of MS Visual Studio 2015 and Nvidia CUDA toolkit
CUDA / Microsoft Visual C++ compatibility: In Windows, the NVIDIA CUDA compiler nvcc uses a Visual C/C++ compiler behind the scenes.
- Install Visual Studio Community 2015 with update 3, x64 (Release date: 27/Jun/2016)
- Install the lastest
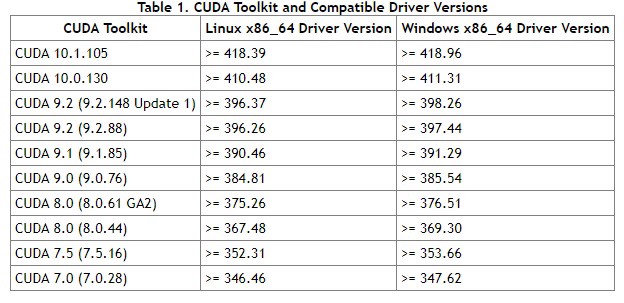
NVIDIA Driver. You need to ensure that your driver version matches or exceeds your CUDA Toolkit version.

- Install CUDA toolkit 8.0 GA1 (sept 2016) with local installer, which is a stand-alone installer with a large initial download.
Folder locations:
(1) CUDA SDK:
C:\Program Files\NVIDIA GPU Computing Toolkit\CUDA\v8.0
Its include folder contains the cuda_xx.h files of CUDA.
(2) CUDA Samples:
C:\ProgramData\NVIDIA Corporation\CUDA Samples\v8.0\common
Its inc folder contains the xx.h files.
(3) My Visual Studio 2015 project folder:
C:\Users\Papa\Documents\Visual Studio 2015\Projects
Installation checking with deviceQuery
The best way to check your computer environment is to run an existing Nvidia sample project: deviceQuery.
- Copy the folder C:\ProgramData\NVIDIA Corporation\CUDA Samples\v8.0\1_Utilities\deviceQuery into the Projects folder C:\Users\Papa\Documents\Visual Studio 2015\Projects
- Launch Visual Studio.
In Start Page, select Open Project...
- Open deviceQuery_vs2015.sln of project folder.
Click deviceQuery.cpp file in Solution Explorer to open it.The word include before < helper_cuda.h> is wave-underlined in red.
The Solution Platform x64 is shown near Debug. - Right click the project name deviceQuery in Solution Explorer, then select Properties.
The panel of deviceQuery Property Pages appears.
Under Configuration Properties, select VC++ Directories.
Add an extra ; at the end of Include Directories, then add C:\ProgramData\NVIDIA Corporation\CUDA Samples\v8.0\common\incClick the mouse so that Appliquer button becomes active. Click Appliquer button then OK button. - The red wave line under #include has disappeared.
- Select Build menu then Build Solution.
Five files (deviceQuery.exe, deviceQuery.lib, deviceQuery.exp, deviceQuery.ilk, and deviceQuery.pdb) are generated in the folder C:\Users\Papa\Documents\Visual Studio 2015\bin\win64\Debug.
- Select Debug menu then Start Without Debugging.
deviceQuery.cpp project
Create your own deviceQuery project.
- In Start Page, click New Project...
- Select Win32 Console Application.
Provid the name of the project: ConsoleApplication-deviceQueryClick OK button. - Welcome to the Win32 Application Wizard panel appears.
Click Next > button.
- Application Settings panel appears.
Ensure to select Empty project and click Finish button.
- The Visual Studio editor appears.
Right-click the folder of Source Files in Solution Explorer. Select Add then New Item...
- The default choice is C++ File (.cpp).
Provid the name of the file: Test-deviceQuery.cppClick Add button. - An empty source file appears for editing.
- Copy and paste the file C:\ProgramData\NVIDIA Corporation\CUDA Samples\v8.0\1_Utilities\deviceQuery\deviceQuery.cpp into the empty source file.Many words are wavy-underlined in red.
- Select x64 platform.
- Right-click the file Test-deviceQuery.cpp in Solution Explorer.
Select Properties.
The panel of Test-deviceQuery.cpp property Pages appears.The Item Type is C/C++ compiler. Close the panel. - Right-click the project ConsoleAplication-deviceQuery in Solution Explorer.
Choose Build Dependencies then Build Customizations...
The Visual C++ Build Customizations Files dialog appears.Tick CUDA 8.0(.targets, .props). As a result, VC++ knows that CUDA C/C++ is required. - Right click the project ConsoleAplication-deviceQuery in
Solution Explorer. Select Properties.
Select CUDA C/C++ then Common.Choose 64-bit (--machine 64) for Target Machine Platform.
Click Appliquer button then OK button. - The word include before <cuda_runtime.h> and others are not wavy-underlined.
- Right click the project ConsoleAplication-deviceQuery in
Solution Explorer. Select Properties.
Select VC++ Directories.
Add C:\ProgramData\NVIDIA Corporation\CUDA Samples\v8.0\common\inc in Include Directories.Click Appliquer button then OK button. - The word include before <helper_cuda.h> is not wavy-underlined.
- Select Build menu then Build Solution.
Error List appears.
- Right click the project ConsoleAplication-deviceQuery in
Solution Explorer. Select Properties.
Click Linker, then Input.
Add cudart_static.lib; in Additional Dependencies.Click Appliquer button then OK button. - Select Build menu then Rebuild Solution.
Five files (ConsoleApplication-deviceQuery.exe, ConsoleApplication-deviceQuery.lib, ConsoleApplication-deviceQuery.exp, ConsoleApplication-deviceQuery.ilk, and ConsoleApplication-deviceQuery.pdb) are generated. This time, they are located in the folder C:\Users\Papa\Documents\Visual Studio 2015\Projects\ConsoleApplication-deviceQuery\x64\Debug.
- Select Debug menu then Start Without Debugging.
bandwidthTest.cu project
Create your our bandwidthTest project.
- In Start Page, select New Project...
- Select Win32 Console Application. Provid the name of the project:
ConsoleApplication-bandwidthTest.
Click OK button.
- Welcome to the Win32 Application Wizard panel appears. Click Next > button.
- Application Settings panel appears. Select Empty project then click Finish button.
- The Visual Studio editor appears. Right click the folder of Source Files in Solution Explorer for adding a new item. Select Add then New Item...
- Provid the name of Visual C++ File(.cpp): test-bandwidthTest.cu.
The file extension is .cu instead of .cpp. Click Add button.
The file extension is important. VC++ knows that this is a CUDA source file, which must be compiled with nvcc. - An empty source file appears for editing.
- Copy and paste the file C:\ProgramData\NVIDIA Corporation\CUDA Samples\v8.0\1_Utilities\bandwidthTest\bandwidthTest.cu into the empty source file.Several include words are wave-underlined in red.
- Select x64 platform.
- Right click the file test-bandwidthTest.cu in Solution Explorer. Select Properties.
Check that the Item Type is Does not participate in build. The choice box does not contain CUDA C/C++. Close the panel.

- Right click the project ConsoleAplication-bandwidthTest in
Solution Explorer. Select Build Dependencies then Build Customizations...
Tick CUDA 8.0(.targets, .props).
- Right click again the file test-bandwidthTest.cu in
Solution Explorer. Select Properties.
This time, the choice box contains CUDA C/C++. Select CUDA C/C++.

- Click the mouse so that Appliquer button becomes active. Click Appliquer button then OK button.
- Right click the project ConsoleAplication-bandwidthTest in Solution Explorer. Select Properties, CUDA C/C++, and Common. Choose 64-bit (--machine 64) for Target Machine Platform. Click Appliquer button then OK button.
- The word include before <cuda_runtime.h> and that before <cuda.h> are not wave-underlined.
- Right click the project ConsoleAplication-bandwidthTest in Solution Explorer. Select Properties, then VC++ Directories. Add C:\ProgramData\NVIDIA Corporation\CUDA Samples\v8.0\common\inc in Include Directories. Click Appliquer button then OK button.
- The word include before <helper_functions.h> and that before before <helper_cuda.h> are not wave-underlined.
- Right click the project ConsoleAplication-bandwidthTest in Solution Explorer. Select Properties, Linker, and Input. Add cudart_static.lib; in Additional Dependencies. Click Appliquer button then OK button.
- Select Build menu then Rebuild Solution.
- Select Debug menu then Start Without Debugging
Mandelbrot.cu project
Create your Mandelbrot project.
- In Start Page - Microsoft Visual Studio, select New Project...
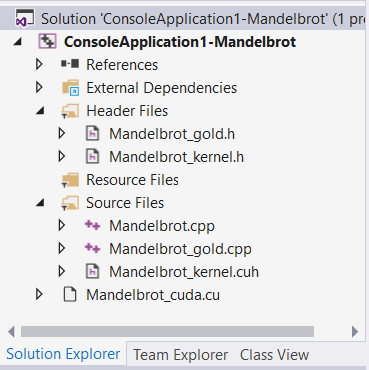
- Select Win32 Console Application. Provid the name of the project: ConsoleApplication1-Mandelbrot. Click OK button.
- Welcome to the Win32 Application Wizard panel appears. Click Next > button.
- Application Settings panel appears. Tick Empty project then click Finish button.
- The Visual Studio editor appears.
***************** - Right click the folder of Source Files in Solution Explorer for adding a new item. Select Add then New Item...
- Provid the name of C++ File(.cpp): Mandelbrot_cuda.cu.
The file extension is .cu instead of .cpp. Click Add button.
The file extension is important. VC++ knows that this is a CUDA source file, which must be compiled with nvcc. - An empty source file appears for editing.
- Copy and paste the file C:\ProgramData\NVIDIA Corporation\CUDA Samples\v8.0\2_Graphics\Mandelbrot\Mandelbrot_cuda.cu into the empty source file.
***************** - Right click the folder of Source Files in Solution Explorer for adding a new item. Select Add then New Item...
- Provid the name of C++ File(.cpp): Mandelbrot.cpp.
Click Add button. - An empty source file appears for editing.
- Copy and paste the file C:\ProgramData\NVIDIA Corporation\CUDA Samples\v8.0\2_Graphics\Mandelbrot\Mandelbrot.cpp into the empty source file.
***************** - Right click the folder of Source Files in Solution Explorer for adding a new item. Select Add then New Item...
- Provid the name of C++ File(.cpp): Mandelbrot_gold.cpp.
Click Add button. - An empty source file appears for editing.
- Copy and paste the file C:\ProgramData\NVIDIA Corporation\CUDA Samples\v8.0\2_Graphics\Mandelbrot\Mandelbrot_gold.cpp into the empty source file.
***************** - Right click the folder of Source Files in Solution Explorer for adding a new item. Select Add then New Item...
- Provid the name of C++ File(.cpp): Mandelbrot_kernel.cuh.
The file extension is .cuh. Click Add button. - An empty source file appears for editing.
- Copy and paste the file C:\ProgramData\NVIDIA Corporation\CUDA Samples\v8.0\2_Graphics\Mandelbrot\Mandelbrot_kernel.cuh into the empty source file.
***************** - Right click the folder of Header Files in Solution Explorer for adding a new item. Select Add then New Item...
- Select Header File(.h).
Provid the name of Header File(.h): Mandelbrot_gold.h.
The file extension is .h. Click Add button. - An empty source file appears for editing.
- Copy and paste the file C:\ProgramData\NVIDIA Corporation\CUDA Samples\v8.0\2_Graphics\Mandelbrot\Mandelbrot_gold.h into the empty source file.
***************** - Right click the folder of Header Files in Solution Explorer for adding a new item. Select Add then New Item...
- Select Header File(.h).
Provid the name of Header File(.h): Mandelbrot_kernel.h.
Click Add button. - An empty source file appears for editing.
- Copy and paste the file C:\ProgramData\NVIDIA Corporation\CUDA Samples\v8.0\2_Graphics\Mandelbrot\Mandelbrot_kernel.h into the empty source file.
***************** - Select x64 platform.
- Right click the project ConsoleApplication1-Mandelbrot in
Solution Explorer. Select Build Dependencies then Build Customizations...
Tick CUDA 8.0(.targets, .props). Click OK button.
***************** - Right click the file Mandelbrot_kernel.cuh in Solution Explorer. Select Properties.
The Item Type is Does not participate in build. Close the panel.
***************** - Right click the file Mandelbrot_cuda.cu in Solution Explorer. Select Properties.
Select CUDA C/C++ for Item Type. Click Appliquer button. - Select CUDA C/C++ then Common.
Choose 64-bit (--machine 64) for Target Machine Platform.
Click Appliquer button then OK button.
***************** - Right click the file Mandelbrot.cpp in Solution Explorer. Select Properties.
The Item Type is C/C++ compiler. Close the panel.
***************** - Right click the file Mandelbrot_gold.cpp in Solution Explorer. Select Properties.
The Item Type is C/C++ compiler. Close the panel.
***************** - Right click the file Mandelbrot_gold.h in Solution Explorer. Select Properties.
The Item Type is C/C++ header. Close the panel.
***************** - Right click the file Mandelbrot_kernel.h in Solution Explorer. Select Properties.
The Item Type is C/C++ header. Close the panel.
***************** - Right click the project ConsoleAplication1-Mandelbrot in
Solution Explorer. Select Properties, then VC++ Directories.
Add C:\ProgramData\NVIDIA Corporation\CUDA Samples\v8.0\common\inc; in Include Directories. It contains some XXX.h files.
Add C:\ProgramData\NVIDIA Corporation\CUDA Samples\v8.0\common\lib\x64; in Library Directories. It contains glew64.lib.Click Appliquer button then OK button. - Right click the project ConsoleAplication1-Mandelbrot in
Solution Explorer. Select Properties, Linker, and Input.
Add cudart_static.lib; glew64.lib; in Additional Dependencies.Click the mouse for activing Appliquer button. Click Appliquer button then OK button. - Right click the project ConsoleAplication1-Mandelbrot in
Solution Explorer. Select Properties, CUDA C/C++, and Common.
Choose 64-bit (--machine 64) for Target Machine Platform.
Click Appliquer button then OK button.
- Select Build menu then Build Solution. A message panel appears.
Tick Apply to all documents. Click Yes button.
- Five files (ConsoleApplication1-Mandelbrot.exe, ConsoleApplication1-Mandelbrot.lib, ConsoleApplication1-Mandelbrot.exp, ConsoleApplication1-Mandelbrot.ilk, and ConsoleApplication1-Mandelbrot.pdb) are generated in the folder C:\Users\Papa\Documents\Visual Studio 2015\Projects\ConsoleApplication1-Mandelbrot\x64\Debug.
- Copy and paste the two files glew64.dll and freeglut.dll from the folder C:\Program Files\NVIDIA GPU Computing Toolkit\CUDA\v8.0\extras\demo_suite into the folder C:\Users\Papa\Documents\Visual Studio 2015\Projects\ConsoleApplication1-Mandelbrot\x64\Debug, the folder containing ConsoleApplication1-Mandelbrot.exe.
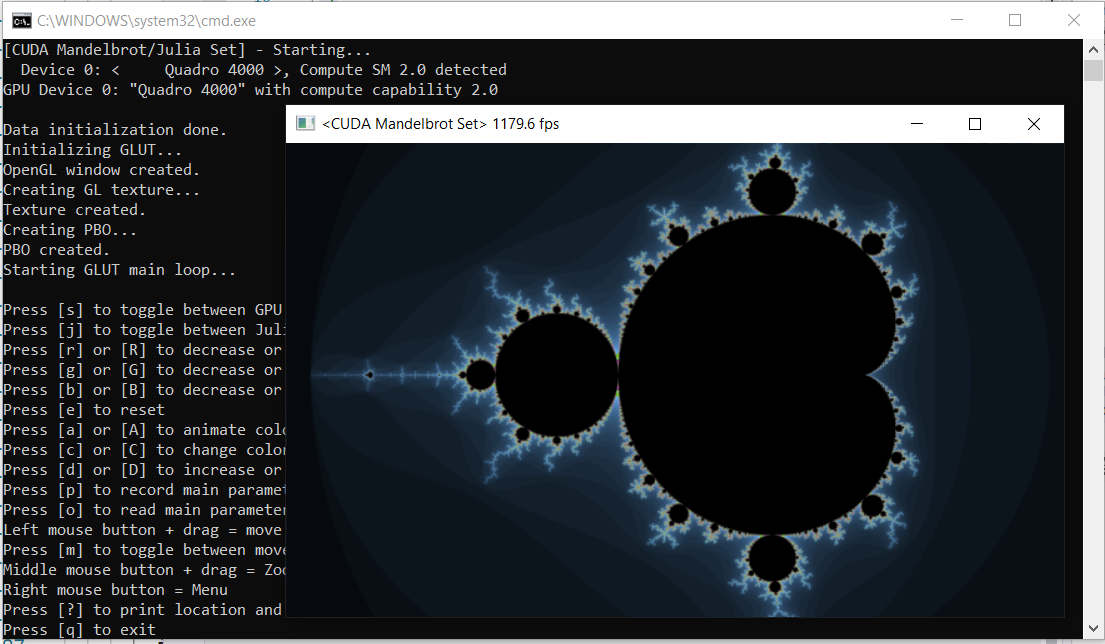
- Select Debug menu then Start Without Debugging
CUDA and Visual Studio references
- Augustin: Getting started with Visual Studio for C and C++ development
- Nilton Cesar Rojas Vales: Install CUDA on Windows: The definitive guide
- Microsoft: VC++ directories property page (Windows)
- Microsoft: Create a C++ console app project
- 欧新宇: Cuda-convnet配置指南 on Windows8.1+CUDA6.5+VS2013
- Developpez: Une introduction à CUDA
- Techspot: Nvidia Quadro Graphics ODE Driver 412.16 for Windows 10 64-bit


